SFTP adapter in SAP cloud integration flow
This is a tutorial to create an integration flow that access SFTP server in the simplest way. We will perform a short exercise to go through how to use SFTP adapter as well as how to set up authentication between cloud integration flow and SFTP server.
Prerequirestes:
- Complete the exercise in previous blog Odata adapter in SAP cloud integration flow
- Setup SFTP Cloud instance
SFTP Cloud instance
Create an account from below link. Initial registration does not require credit card. Note that first 7 days are free and update required afterwards. https://app.sftpcloud.io/register
Create an instance of SFTP server by chossing the data senter near you.

Go to User tab and create a new SFTP user and set a password.

Go to file manager tab and create a test directory.

1. Register SFTP host as Known Host
First trust between SFTPCloud and Integration Suite instance must be established. Go to Integration Suite and from the left side pane Monitor-> Integration and APIs-> Connectivity Tests.

Select SSH and enter the host name and port from SFTPCloud. Set authentication as None and Send. You should get.


The host should be succesfully reached. Copy the host key.

Open a notepad and paste the key and save as text file. Go to Security Material tile and upload the file as KnowHosts which is used for SSH authentication. This is reqruied step because to establish SSH connection between SAP Cloud Integration (former CPI) and SFTP server, you need to add the below parameters to the file and deploy it on the tenant:
- Hostname
- Key Algorithm
- Host Key (encoded using base64)
Refer to SAP noet 2700759 for more details. https://me.sap.com/notes/2700759

2. Adf public key to SFTP user
Distribute Integration Suite’s public key and add it to sftp user in SFTP cloud. Go to Integration Suite and from the left side pane Monitor-> Integration and APIs-> Manage Keystore. There should be a defualt key pair called sap_cloudintegrationcertificate. Download the public key.

Go to SFTP Cloud instance and go to the sftpuser-> Public keys and paste the public key contents and save key.

Now go back to Integration Suite and from the left side pane Monitor-> Integration and APIs-> Connectivity Tests. This time we will test public key authentication. Enter your SFTP user name, private key alias(sap_cloudintegrationcertificate) and click Send.

If it’s succesfull, public authentication is working.

3. Add SFTP Adapter in cloud integration flow
Now let’s add an event to send data with SFTP adapter. Open the cloud integration flow created in Odata adapter in SAP cloud integration flow. Add a receiver from participant icon and place it outside the flow. Connect End event with the receiver by arrow and set SFTP as the protocol.

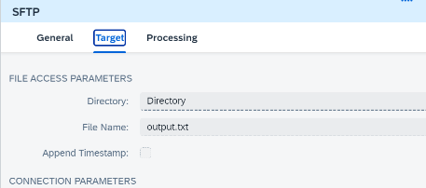
Go to target tab and set the following details
| Directory | Name of directory created in SFTPCloud |
| File name | output file name in generated in SFTPCloud |
| Address | host name from SFTP Cloud |
| Proxy type | Internet |
| Authentication | Public Key |
| User name | User name from SFTP Cloud |
| Private Key Alias | sap_cloudintegrationcertificate from key store |

Go to Processing tab and change the settings as needed.
4. Deploy and test the integration flow
Save and deploy the integration flow. Confirm the deployment and execution from monitoring page.

Check the SFTP Cloud instance and the target directory. An file is generated from integration flow. It contains the data consumed from the Northwind Odata service setup in Odata adapter in SAP cloud integration flow.


